How to Migrate from Trello to ClickUp in 2025
I remember the exact moment I realized Trello wasn’t cutting it anymore [web:1][web:6].
I had 14 browser tabs open—each one a different board—and I was frantically clicking between “Marketing Q1,” “Client Projects,” and “Content Calendar” just to figure out what was due that day. My team was paying for three different Power-Ups that should’ve been basic features, and every time someone asked “What’s the status on that project?” I had to mentally piece together information scattered across multiple cards.
Here’s the truth: Trello is brilliant for getting started. It’s visual, it’s simple, and it feels like organizing sticky notes on a wall. But once your business grows past a certain point, that simplicity becomes a cage [web:5]. You need hierarchy, automation, and the ability to see everything in one place without opening 47 tabs.
The good news? Moving from Trello to ClickUp is way easier than you think. In this guide, I’ll walk you through the entire migration process—and I mean the entire thing, from exporting your boards to setting up your new workspace [web:1][web:6]. Most people complete this in under 10 minutes using ClickUp’s native import tool.
Don’t have a ClickUp account yet? Sign up here for free to follow along. You’ll need it to access the import feature.
Quick Navigation
Why Move from Trello to ClickUp?
Before we dive into the how, let’s talk about the why—because understanding what makes ClickUp different will help you set it up correctly from day one [web:6].
The Hierarchy Difference
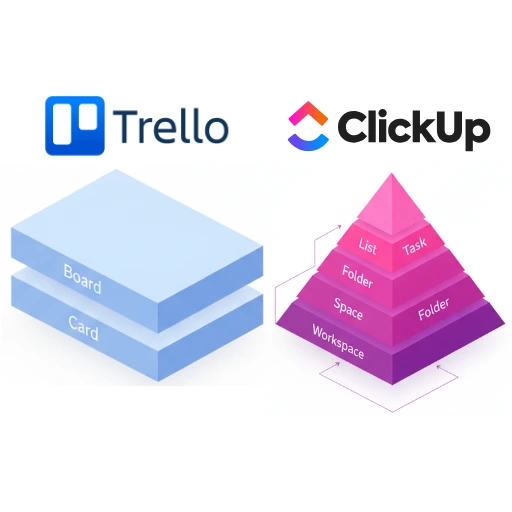
Here’s the biggest mental shift you need to make: Trello is flat. ClickUp is structured [web:5].
In Trello, you have Board → Card. That’s it. If you want to organize multiple related projects, you create multiple boards, which means multiple tabs and zero ability to see the big picture.
In ClickUp, you have Space → Folder → List → Task → Subtask [web:6]. Why does this matter? Let’s say you’re running a marketing agency. In Trello, you might have separate boards for “Client A,” “Client B,” and “Internal Marketing.” In ClickUp, you’d create a Space called “Marketing,” then Folders for each client, with Lists for different project types. Suddenly, you can view all client work at once, filter by deadline across everything, and actually manage your business instead of just tracking cards.
Cost Savings
I’ve talked to dozens of teams who were paying Trello $12.50 per user per month for Premium just to get Custom Fields, Calendar View, and advanced automation via Butler [web:6]. ClickUp’s automation is included in the free plan, along with features that would cost you $150/month for a 12-person team in Trello. Even ClickUp’s paid plans start at $7/user/month with significantly more included.
The All-in-One Factor
This is where ClickUp stops being a Trello alternative and becomes something entirely different [web:6]. You’re not just getting better task management—you’re getting ClickUp Docs for writing SOPs, Whiteboards for brainstorming, Chat for team communication, and Goals & Dashboards to track OKRs and visualize progress in real-time.
Pre-Migration Checklist: Do This First
I learned this the hard way: importing garbage from Trello just gives you organized garbage in ClickUp [web:5]. Spend 30 minutes cleaning house before you migrate, and you’ll save yourself hours of cleanup later.
Audit Your Trello Boards
Open each board and ask yourself: “Do I actually need this in my new system?” Archive or delete old projects that are 100% complete, experimental boards you created and abandoned, and personal boards mixed in with work boards [web:5]. The goal is to import only active, relevant work.
Standardize Your Column Names
If one board uses “To Do” and another uses “Todo” and a third uses “TO DO,” ClickUp’s import tool might create three separate status types [web:1]. Before migrating, go through your boards and make sure similar columns have identical names: To Do (not “To do” or “TODO”), In Progress (not “In progress” or “In-Progress”), and Done (not “Complete” or “Finished”).
Notify Your Team
Send a quick message like this: “Hey team—we’re migrating from Trello to ClickUp this Friday at 5 PM. Please make sure all updates are in Trello by then. Starting Monday, we’ll be 100% on ClickUp.” [web:6] Why Friday evening? It gives you the weekend to set things up without team members creating conflicting updates in both systems.
Step-by-Step: Using the ClickUp Import Tool
Alright, this is where the magic happens. ClickUp has a native Trello importer that handles 95% of the work automatically [web:1][web:6]. Here’s exactly how to use it.
Step 1: Locate the Import Tool
Log into your ClickUp workspace, click your profile icon in the bottom-left corner, select Settings, click Import/Export in the left sidebar, and choose Trello from the list of import options [web:3][web:4]. You’ll see a big blue button that says “Import from Trello.” Click it.

Step 2: Authorize the Connection
ClickUp will ask you to authorize access to your Trello account [web:1][web:3]. This uses Trello’s official API, so it’s completely secure—you’re not giving away your password. Click Authorize, then log into Trello if prompted. You’ll be redirected back to ClickUp once the connection is established.
Step 3: Map Your Users
ClickUp will show you a list of Trello members from your boards and ask you to match them to ClickUp users [web:6]. If someone hasn’t joined your ClickUp workspace yet, you can invite them via email directly from this screen, assign their tasks to yourself temporarily, or skip them if they’re no longer on the team. Make sure everyone has accepted their ClickUp invite before you start the import to make this step instant.
Step 4: Select Which Boards to Import
You’ll see a list of all your Trello boards with checkboxes next to them [web:4]. Here’s my recommendation: Don’t import everything just because you can [web:6]. Only select active project boards, boards with tasks that need follow-up, and template boards you want to reuse. Leave unchecked personal boards and archived boards you cleaned up earlier.
Step 5: Map Your Statuses
This is the most important part of the entire migration [web:6]. Trello’s “Lists” (the columns on your boards) will become “Statuses” in ClickUp. The import tool will ask you to map each Trello list to a ClickUp status. Here’s what typically happens: To Do → Open, In Progress → In Progress, Done → Closed.
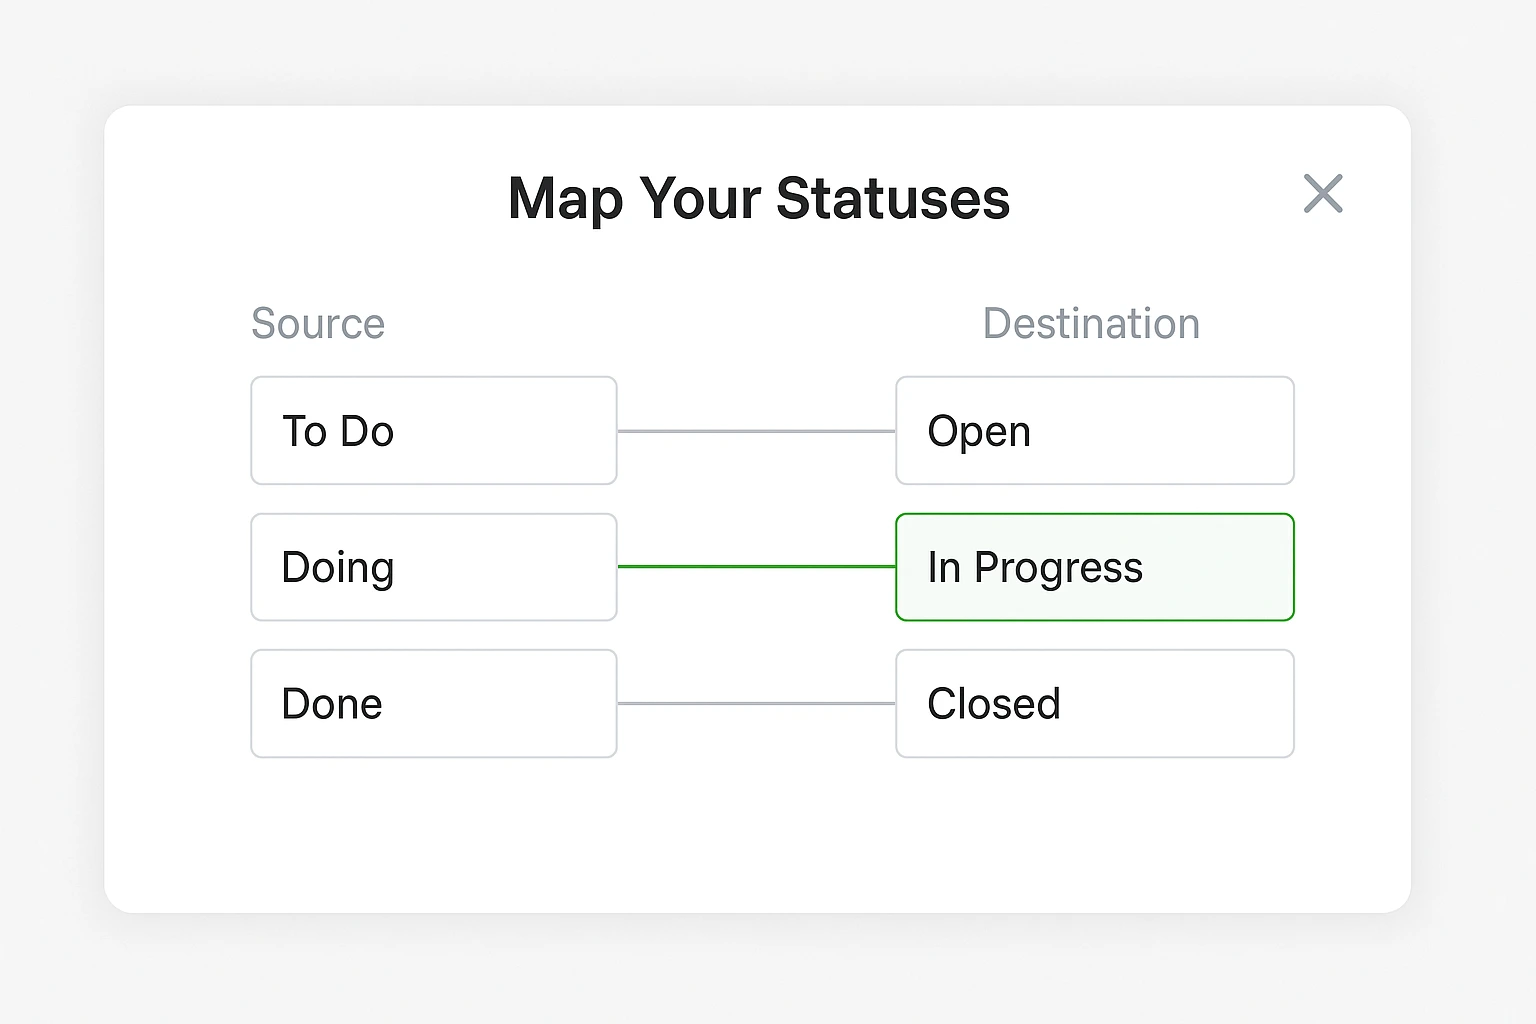
But what if your workflow is more complex? Before importing, create a Custom Status Template in ClickUp that matches your Trello workflow exactly by going to Settings → Statuses, clicking Add Status, and recreating your Trello columns as ClickUp statuses [web:6]. Then map them one-to-one during import.
Step 6: Click “Import” and Wait
Once everything is mapped, click the Start Import button [web:1][web:3]. Depending on how many boards and cards you have, this takes anywhere from 30 seconds to 5 minutes. You’ll see a progress bar—don’t close the window until it’s done. When it finishes, you’ll get a confirmation message.
Post-Migration Cleanup: Organizing Your New Home
Your tasks are imported, but your ClickUp workspace probably looks like a messy moving truck right now [web:5]. Let’s organize it.
Organizing the Hierarchy
Here’s what typically happens: Your Trello Boards import as ClickUp Lists [web:6]. So if you had boards called “Marketing,” “Sales,” and “Product,” you’ll now have three Lists all sitting in your default Space. Here’s how to structure it properly: Create Folders to group related Lists (like a “Marketing” Folder containing “Content Calendar,” “Social Media,” and “Email Campaigns” Lists), and use Spaces for top-level separation (like creating a Space for each client if you’re managing multiple clients).
Checking Custom Fields
If you used Trello’s Custom Fields feature (available on Premium plans), those should have imported as ClickUp Custom Fields [web:6]. Go into a few tasks and verify that drop-down fields imported correctly (e.g., “Priority: High/Medium/Low”), number fields retained their values, and date fields show the correct dates.
Setting Permissions
By default, everyone in your workspace can see everything [web:6]. If you’re working with clients or contractors, you’ll want to lock that down. Go to Settings → Sharing & Permissions and make certain Spaces or Folders private, invite guests to specific Lists only, and set some team members as Viewers instead of Editors if they just need visibility.
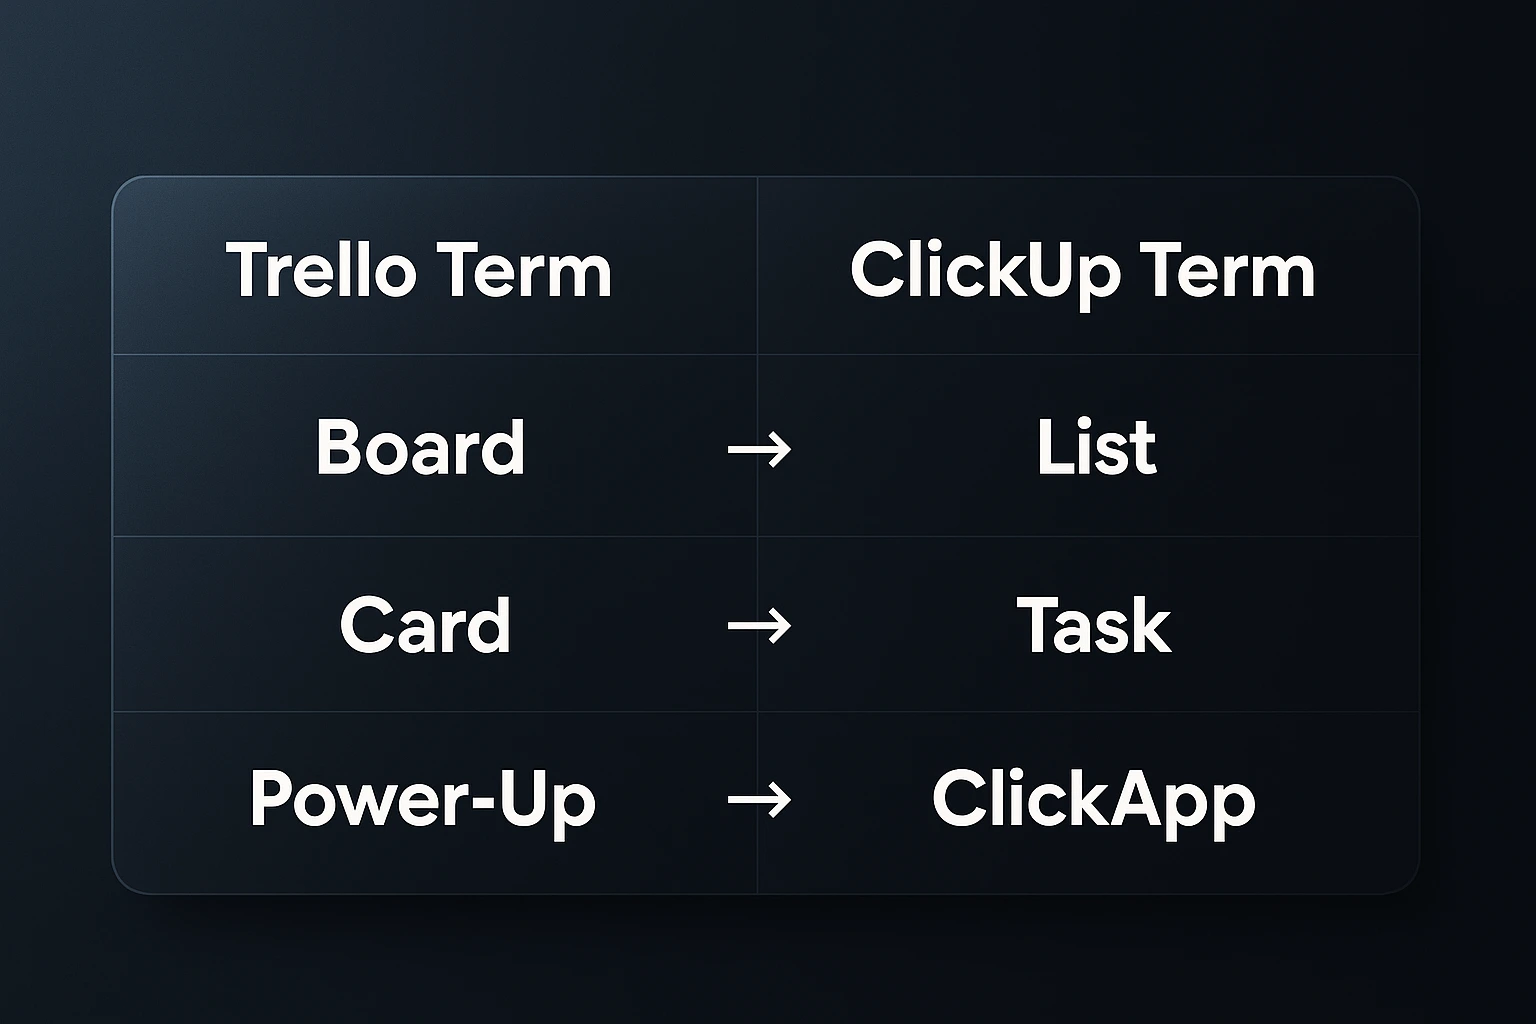
Trello vs. ClickUp: Translating the Terminology
One of the most confusing parts of switching platforms is learning new vocabulary [web:6]. Here’s a translation guide to speed up that process:
| Trello Term | ClickUp Equivalent | Notes |
|---|---|---|
| Board | List (usually) | Sometimes imports as a Folder depending on size [web:6] |
| Card | Task | Exact same concept [web:6] |
| Power-Up | ClickApp | Free to enable in ClickUp [web:6] |
| Butler Automation | Automations | Built into ClickUp at all plan levels [web:6] |
| Checklist | Checklist or Subtasks | You can convert checklists to full subtasks [web:6] |
| Label | Tag | Works the same way [web:6] |
| Members | Assignees | You can assign multiple people in ClickUp [web:6] |
The biggest mindset shift? Trello is horizontal (boards side by side). ClickUp is vertical (hierarchy top to bottom). Once you internalize that, everything else clicks into place.
3 Features You Can Use Immediately
Now for the fun part—let me show you three features that will make you wonder how you ever survived in Trello [web:6].
Switch Views Instantly
In Trello, you’re locked into Board view. In ClickUp, every List has multiple view options built in: Board View (your familiar Trello layout), List View (a clean spreadsheet-style view), Calendar View (see all tasks with due dates in a monthly grid), Gantt Chart (visualize project timelines), and Table View (manage tasks like an Airtable database) [web:6]. Open any List and click the View dropdown at the top to switch between them.
ClickUp Docs
In Trello, if you wanted to write detailed instructions or SOPs, you’d either cram it into the card description, attach a Google Doc, or use a Power-Up like Confluence [web:6]. ClickUp has Docs built in, and they’re genuinely great. You can create a Doc and link it directly to a task, write meeting notes with action items that auto-create tasks, build a company wiki with nested pages, and use templates for recurring documents. Click the + New button in the sidebar and select Doc to get started.
The “Everything View”
This is the feature that makes ClickUp feel like an upgrade, not just an alternative [web:6]. In Trello, if you wanted to see all your tasks across every board, you couldn’t. In ClickUp, there’s a view called Everything (found in the sidebar) that shows you every task assigned to you across all Spaces, Folders, and Lists, filterable by due date, priority, status, or custom fields. You can also create Saved Filters for recurring views like “High Priority Tasks,” “Overdue Items,” or “Tasks Waiting on Client Response.”
Ready to Experience the Difference?
Stop juggling multiple Trello boards and start managing everything in one powerful workspace.
Start Your Free ClickUp TrialCommon Migration Pitfalls & FAQ
Let me address the issues I see most often when helping people migrate [web:5][web:6]:
My Attachments Didn’t Transfer
Trello has a file size limit on attachments (250MB per file on paid plans, 10MB on free) [web:6]. If your attachments are too large, ClickUp’s importer might skip them. The workaround: Download large files from Trello manually, then re-upload them to ClickUp. It’s a one-time inconvenience.
What Happens to Archived Trello Cards?
Archived cards do NOT import by default—only active cards [web:6]. If you have important information in archived cards, unarchive them before migrating, then archive them again in ClickUp after import.
Can I Keep Using Trello and ClickUp at the Same Time?
Technically, yes. Practically, no—and I strongly advise against it [web:6]. Running both simultaneously means double data entry (nightmare for your team), confusion about which system is the “source of truth,” and tasks falling through the cracks. Rip the band-aid off. Pick a migration date, move everything over, and shut down Trello.
My Team Is Freaking Out About the Change
Change resistance is real, especially if your team loved Trello’s simplicity [web:5][web:6]. Here’s how I handle it: Keep Board view as the default for the first week (it looks just like Trello, so the transition feels smaller), create a “ClickUp Tips” Doc with screenshots and links to training videos, assign a “ClickUp champion” on your team who can help others, and give it two weeks before introducing advanced features.
Ready to Make the Switch?
Migrating from Trello to ClickUp is technically simple—you just did it in 10 minutes by following the steps above [web:1][web:6]. But here’s the truth I tell everyone: the technical migration is easy. The cultural shift takes about a week [web:5].
Your team will grumble for a few days. Someone will say “Trello was simpler.” You’ll second-guess yourself around day three. Then, on day seven, someone will use the Everything view to find a task they would’ve lost in Trello [web:6]. Someone else will create a Doc linked to a project and realize they don’t need Google Drive open anymore. And you’ll run a report that would’ve taken you an hour of manual work in Trello—and ClickUp will generate it in 12 seconds.
That’s when you’ll know you made the right call. Start your free ClickUp account here and give yourself the upgrade your business deserves. Your future self—and your team—will thank you.
Related Resource: Want to supercharge your ClickUp workflow even further? Check out our comprehensive guide on using ClickUp’s AI API to automate advanced tasks and integrate with other tools.